If you plan to go hiking and need a few items please book below your gear you need for your hiking trip. Please note that when you need a complete hiking package, go to the camping package page here https://jensoutfitters.com/our-packages/ and select the backpacking package.
Searching Availability…
Top 10 items to bring on a hike according to North Shore Rescue:
1. Light
Flashlight or a headlamp with extra batteries (and light bulb if not LED). Green cyalume stick or small turtle lights as emergency backup.
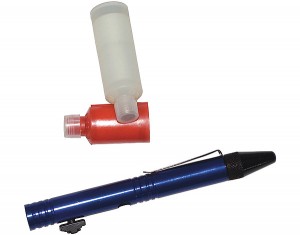
2. Signalling Device
Whistle (we recommend the Fox 40 whistle with a lanyard), Bear Bangers, Pencil Flare
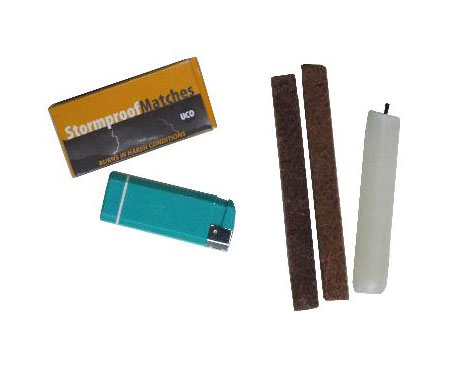
3. Fire Starter
Matches (water proof or in plastic bag) or lighter. We also recommend a commercial firestarter and/or a candle. Commercial firestarters can be purchased at outdoor stores like Mountain Equipment Coop.

4. Warm clothes
Hat or toque, gloves or mittens, puffy jacket, gortex jacket, polypro underwear, good quality hiking socks and gortex over pants.

5. Pocketknife
Although a multi tool is preferred, a good pocket knife with a quality blade will suffice. It may also be worth carrying a small pruning saw for cutting branches when building a shelter or fire.
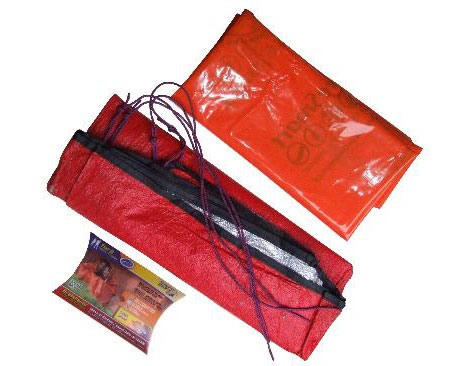
6. Shelter
Large orange plastic bag and thermal tarp.

7. Water and food
Gatorade crystals recommended and high energy food bars
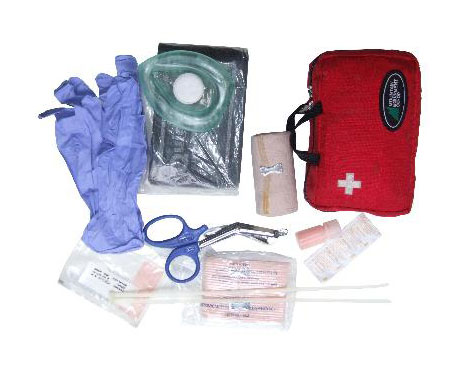
8. First-aid kit
Should include pocket mask; Sam Splint, bulk dressings, protective gloves, bandage, scissors and blister dressings
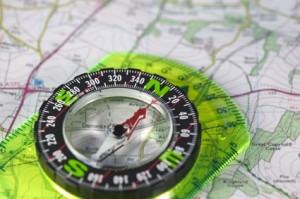
9. Navigation
Good quality compass with built in declination adjustment and both topographical and interpretive maps. we also recommend a GPS unit but only as an adjunct to compass and map. Most team members carry a Garmin 60 series GPS unit that has terrific reception in the trees.

10. Communications – Cell phone
We recommend you bring a cell phone with a fully charged battery. It is advisable to keep the phone turned off, and stored in a ziplock bag. This way, if you get into trouble your phone will be dry and have a full charge. Many people manage to call 911 initially but their phone dies before their location can be relayed, not a desirable situation. If you have a smartphone, you should also know how to get GPS coordinates off of it to give to search and rescue if you become lost or injured (eg. MotionX or iphone compass app) . Depending on the terrain and difficulty of your excursion, it may also be worth considering satellite based communications devices like the Spot, Delorme InReach or a Personal Locator Beacon.
You can check out our educational guide on how to turn “Location services” on, here.
Our top hiking Tips:
– Make sure you have the above list from the North Shore Rescue team 🙂
– Don’t make short-cuts on bringing all items needed (see below). Yes, it is very tempting to hike lightweight, but there a quite a few safety items you NEED to bring that you likely won’t use.
– Test your gear before your trip (yes, even your rented hiking tent)
– Prepare your own food based on taste (needs to be delicious & nutritious), don’t buy the not so tasty dried food (best to make your own if needed, or prepare some easy to make foods that taste amazing). Variety of the food and of the taste is important. OK, for multi-day hikes you may need to purchase dry food, but not for short hikes. Prepare your own trail mix (mix of nuts, fruits & seeds) to your liking – maybe add some tasty herbs and spices, honey, salt. Trail mix is amazing (avoid eating too many granola bars as too much sugar causes short energy spikes) – instead energy needs to last.
– Only bring one set of hiking clothes and one set of camp clothes (sleeping) for overnight hikes.
– Trim your toe nails a few days before your hike (do it a few days before as to recover any nails cut short).
– Never bring a hiking camp chair as you sit on a tree trunk, against a rock or other item, it truly is unnecessary extra weight.
– Always bring a rainproof jacket (even if weather forecast is 100% sunny), weather can change.
– Bring ziplock bags for small items and to store your garbage (with the least possible scent).
– Bring one or 2 garbage bags, one for inside the backpack (or a backpack liner) can be quite smart (avoiding any food smell, keeping items dry)
– Bring duck tape on your hike (not a full roll, but a few pieces on your water bottle will do), you can fix anything with duck tape, if you need to immobilize a fractured body part or even stop bleeding.)
– Have a basic first aid kit (pain killers, blister pads), mosquito repellent, sunscreen, sunglasses, hat, a bear spray kit and a whistle.
– Bring a reliable led headlamp.
– Water purification tablets are easy to bring, safe and lightweight.
– Overpacking is your biggest mistake.
– Tape your feet at spots that may be prone to blisters. Wearing double socks are a good way as well
– Check the weather forecast before starting.
– Go hiking with quality shoes, make sure you have worn them (never use new shoes)
– On the trail, give way to uphill hikers and faster groups.
– Wear layers (lightweight), fleece, wool, therma, no cotton shirts.
– Take regular breaks when hiking. Don’t underestimate hiking uphill.
– Pay attention to trail markers.
– Stay hydrated, keep drinking.
– Look behind you once in a while when you hike, for good orientation, if you have to find back your way and often the views can be worth it.
– Prep tent site carefully before setting up the tent (look at where you pitch the tent, is it cleared and flat, Look at the trees, will they be a potential danger (falling tree, branches), pitch away from any water source (this is an essential part of the animal ecosystem).
– Don’t rely on your phone, batteries die, bring a map and compass.
-Food does not need to be heavy, but it needs to be filling (and tasty).
– When going to bed make sure your headlamp, water bottle and warm clothes are at reach (put clothes in bottom of your sleeping bag)
– For intense hikes up use the Rest Step technique, see video below:
To perform the rest step, you should be stepping forward on an upward climb. As you step, lock your rear knee and keep all of your weight on that rear leg. Swing your other leg forward, relaxing all of its muscles. Once the swinging foot comes to rest on the ground, keep it relaxed so there’s no weight on it. Stop in that position for as long as you need, even if you only need a second. When you’re ready, lock your front leg, swing your back leg forward and repeat the process.